


Introduction
Hello, Co Dev. 🤓 Have you ever found yourself having to repeatedly write a long or complex syntax in any programming language or framework? I can imagine how challenging and time-consuming it might be, especially on the verge of completing a task or project... Good News!🥳 There's no need to worry anymore; I discovered a simple hack that'll help simplify your work. At the end of this article, you will be able to create your custom code snippets, which will save you a lot of time and allow you to add more logic to your code. 🤗
What Are Snippets?
In simple terms, a "code snippet" is a reusable block of code.
Snippets make repetitive tasks easier and faster, which is one of the simplest methods to speed up your development. The snippet you want probably isn't in one of the hundreds of fantastic snippet extensions for VSCode. Custom snippets might be useful here. It is surprisingly simple to write your snippets in VS Code to suit any demand you have. Imagine having to manually write console.log() or cout<< or println() each time you want to troubleshoot your code on the console🤦♂️
However, with "code snippets," you can easily create a customized and reusable syntax, such as the keyword cl for instance, which can be transformed into a full code statement, such as console.log(). Interesting right? Now let's see how to set it up!
How To Write A Custom Snippet
To create a new snippet in your VSCode environment, go to File > Preferences menu and pick the "Configure User Snippets" option, or open the command palette (Ctrl+Shift+P for Windows/Linux users and Shift+Command+P for Mac users) and type in "Preferences: Configure User Snippets."
You'll see three options, which are as follows:
New Global Snippets file
New Snippets file for your current project and
A file with language-specific snippets that will only operate in one language.
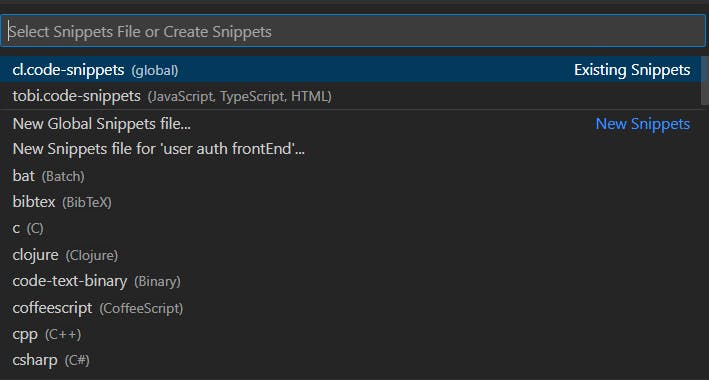
I propose utilizing the "New Global Snippets File," as it will work with all projects and allow us to use the same snippet across several programming languages.
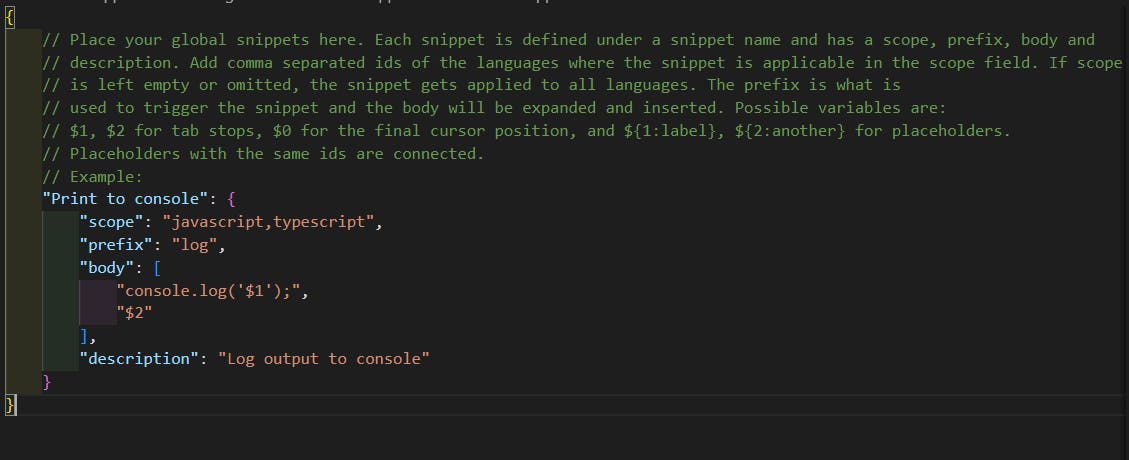
Once you click the "New Global Snippets file," by default you will see a file with a commented template for you to follow. Just go ahead and uncomment(Ctrl+/ for Windows/Linux or Command+/ for Mac) the JSON object section below the "Example:"
Moving ahead, let's create a simple code snippet to help us write console.log with only three letters clg
Start by renaming your JSON object container.
{
  "Print Console.Log": {
    }
}
The name can be whatever you want, but it needs to be included in double quotes because everything in our snippets file is a JSON.) object. Well done so far; now the next thing you'll see is scope, which specifies the programming language for which the snippet is being configured. You can decide to use one code snippet in different programming languages; to do that, you separate each language with a comma, as shown below.
{
  "Print Console.Log": {
    "scope": "javascript, typescript"

  }
}
The next step is to define the prefix of your snippet, which will be transformed into a line of code or a large block of code. Here I used only three letters clg to define my prefix; you can decide to use a smaller amount of text or any word that suits your preference.
{
  "Print Console.Log": {
    "scope": "javascript, typescript",
    "prefix": "clg"
  }
}
The next thing to do is to define the snippet body which is what the prefix text will grow into.
{
  "Print Console.Log": {
    "scope": "javascript, typescript",
    "prefix": "clg",
    "body": "console.log();"
  }
}
One more thing you should add is the description which is useful when using auto-code completion as it will show the description of the snippet you created.
{
  "Print Console.Log": {
    "scope": "javascript, typescript",
    "prefix": "clg",
    "body": "console.log();",
    "description": "Log output to console"
  }
}
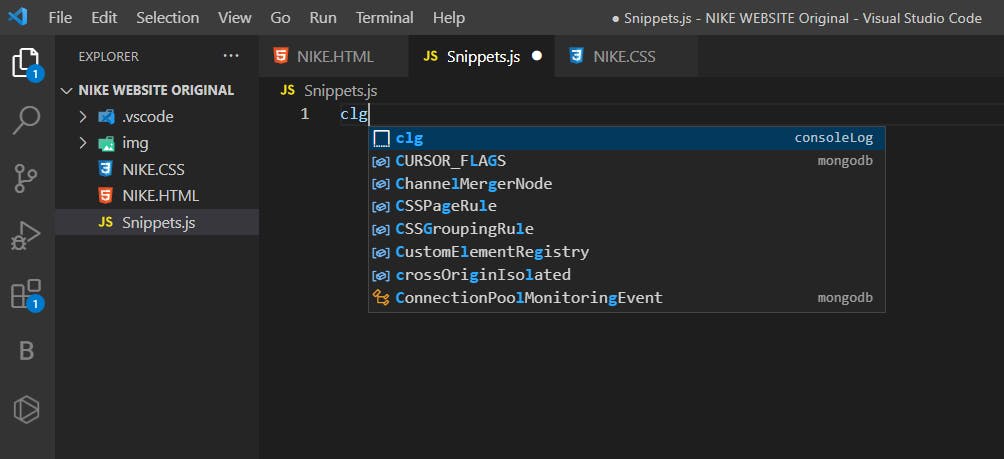
The Outcome
When the aforementioned code snippet has been successfully installed, create a ".js" file and type the term clg; VSCode will then offer the prefix you just created; choose it, and the code syntax you wrote in the snippet's body should appear.

Bonus Snippet
Now that you've learned the basis for how to create your custom snippet, let's also explore some extra logic we can add to our snippet environment. Below is a CSS code snippet that I consider very helpful when styling a website. Building a web project from scratch can be exhausting at times, but with the use of a few tricks, development becomes more enjoyable. Declaring variables gives programmers a structured approach to creating reusable and editable codes from the onset.
{
  "Print CSS Template": {
    "scope": "css, scss",
    "prefix": "cv",
    "body": "/* @@@Variable Declaration@@@*/
:root{
    /* text colors */
    --text-gray : #808291;
    --text-white: #f8f9fa;
    --text-light: #f6f6f6;
    --text-dark : #1A3260;
    --text-dark2 : #1A3760D4;
    --text-red : #ff4d6d;
    --box-shadow: 0px 0px 50px 0px rgb(0 0 0 / 10%);
    --bg-blue: rgb(249, 243, 255);
    --bg-red: rgb(254, 247, 252);
    --bg-yellow:rgb(255, 255, 246);
    --bg-purple: rgb(246, 255, 255);

    /* font familiy */
    --font-poppins : 'Poppins', 'sans-serif';

    /* gradient colors */
    --bg-gradient : linear-gradient(to right, #ff512f, #dd2476);
    --bg-gradient-indigo: linear-gradient(to right, #8e2de2, #4a00e0);
    --bg-gradient-peach: linear-gradient(to right, #fff7f3, #fff7f3);

    /* images */
    --bg-cover : url('./assets/bgimg1.png');
    --bg-image1: url('./assets/img1.png');
    --bg-image2: url('./assets/img2.png');
    --bg-image3: url('./assets/img3.png');
}

* > * {
    box-sizing: border-box;
    padding: 0;
    margin: 0;
}

a{
    text-decoration: none;
}

ul{
    list-style-type: none;
}
/* @@@/Variables@@@*/",
    "description": "Detailed Layout of CSS variable declaration"
  }
}
"The code can be modified to suit your preferences once you import it into your CSS environment."
I hope you found this article helpful. Please leave a comment with your thoughts and observations; it will mean a lot to me. Thank you for reading, kindly follow me for more interesting updates...🙏❤